Showing posts with label Dinner. Show all posts

Saturday, March 12, 2011

St. Patrick's Day Roundup

Now that my blog has been established for a couple of years, I find that I have enough recipes posted that
I can perhaps provide a quick reference to the Irish inspired things I like to make. So here it is:

Ha ha, admittedly only five recipes, but I do what I can.  If you try nothing else, do the cake or the soda bread. Both are wonderful. And enjoy a pint or two.
Guinness Stout Ginger Cake 


Guinness Beef Stew


Irish Soda Bread


Irish Brown Bread


Corned Beef and Cabbage        

Wednesday, January 19, 2011

The Merlin Menu Top 10 Recipes for Year 2010


I know, it's February, not January. This is the kind of post that, were I up on things, would have been posted right around the New Year. But, I've been a bit distracted trying to find a new position at my company. That's my excuse, anyway.

But here's the deal. As I looked through my newsreader in 2011, I noticed a number of blogs posted their top recipes from the previous year. And I found, that I liked being able to just click on whatever recipe I wanted to without having to scroll through page after page of blog. I figured therefore, that other people probably like this convenience also, so I decided to do one for my blog. And here it is. Hope you find at least one or two things you'd like to try, and maybe catch up on a recipe or two you might have missed over the last year.

Salted Dulce de Leche Cheesecake Bars Decadent and delicious.

Dutch Oven Bread A little baking magic from a Dutch Oven

Cinnamon Currant Bread Another Dutch Oven Bread

Eggs Benedict Who doesn't love Eggs Benedict. Make them at home for 1/10th the price.

Homemade Potato Chips Delicious and easy and fun to make.

Irish Brown Bread Authentic and delicious.

 Lime Cake with Strawberry Compote Light, refreshing, and a great flavor combination.

Salted Caramel Butter Bars Decadent and delicious.


Three Ingredient Tomato Sauce 3 Ingredients and knock your socks off good.

My personal Top Ten from my Blog for 2010.

Friday, October 15, 2010

Spaghetti and Meatballs


I recently posted a delicious 3 ingredient Spaghetti Sauce that has received really good reviews from folks. I was asked if I could provide a meatball recipe to go along with it, and I thought, of course I can. Naturally I had to make it first, so I've been enjoying this dish for several days. Hope you like it.

One thing about meatballs, I don't like meatballs that are hard, or tough, or overcooked etc. Usually this comes about by rough handling when shaping, or frying or baking first before adding to a sauce. The secret to delicious melt in your mouth meatballs is to treat it gently and to cook the meatballs in the sauce, not pre-cooked or fried.

I hope you like this recipe. It's awfully good, and like I said, you can't beat the sauce. (Here's the recipe for the 3 ingredient  sauce as well as my slow-cooker recipe)

Ingredients and Method:
1 cup Breadcrumbs
1/3 cup milk
8 ounces ground beef
8 ounces ground pork
1 cup ground Parmesan Cheese
1 teaspoon salt
1/3 cup chopped parsley
1/2 teaspoon ground nutmeg
1/4 teaspoon ground pepper
2 eggs (beaten)
2 garlic cloves, finely minced, or pressed


Mix milk and breadcrumbs in a small bowl. Set aside

Place beef and pork to a bowl and add cheese, salt, pepper, parsley, garlic, nutmeg and beaten eggs.

Drain milk from breadcrumbs and add to meat mixture.

Mix all ingredients together gently by hand. Try not to compress or squeeze the meat mixture. You're trying
to just combine them thoroughly and yet keep a "looseness" to the meat.

Refrigerate for 20 minutes so it will be easier to shape into meatballs.

Shape into meatballs about the size of a golf ball using a gentle touch. Add directly to cooking sauce 30 minutes before the sauce is done. (If making slow cooker sauce, then add the meatballs one hour prior to
the end of the cooking cycle.)

I made this with my 3 ingredients spaghetti sauce, and dusted it with shaved Parmesan. It was delicious.

Enjoy!

Saturday, September 25, 2010

Three Ingredient Tomato Sauce!


Alright, I've been making tomato sauce for years and years and years.  And for a long time, I figured the more ingredients the better, right?   So, sauce with balsamic, and/or carrots, and/or brown sugar, tons of spices, fresh and/or dried, mushrooms occasionally, real tomatoes, canned tomatoes, different kinds of onions, etc. etc. etc.   The more the better right? ................ Wrong, apparently. Not that tomato sauce with a lot of ingredients isn't good, it's just that, sometimes, less is MORE.

I came across an article regarding Marcella Hazan, and her recipe for Tomato Sauce.   Ahem, only three ingredients. Yes, THREE!

What can I tell you. The sauce is amazing!  Bright, and vibrant, and tangy and absolutely delicious. Something about the butter gives the tomato sauce a "mouth feel" that is indulgent. The onion adds just a hint of depth and the tomatoes just are uncluttered by anything else. It tastes like a fresh tomato, I don't know how to describe it. I love this sauce. (I admit I did add some fresh basil, but old habits die hard).

Next up for me is this sauce and my homemade meatballs.

Please give it a try. I bet you are as astounded as I was.

Ingredients and Method:

1 28 oz canned whole or diced tomatoes (I use San Marzano)
1 onion, quartered
1 stick of butter
salt, to taste

Yup, that's it!

Place tomatoes in a large saucepan. Cut up tomatoes if using whole ones. Add the butter. Peel and quarter the onion and place in sauce.

Heat over medium heat until it begins to bubble and then lower heat slightly and let simmer for 45 minutes, stirring occasionally. Discard onions (or eat separately if you'd like). Taste and add salt if needed. (You may not need it if you used salted butter)

Ladle sauce onto pasta of your choice and sprinkle with fresh Parmesan or even better, Parmesan Reggiano cheese.

Enjoy!

Sunday, September 12, 2010

Lemon Chicken


Over the years I've always enjoyed cooking a variety of ethnic dishes. One of my favorites is Chinese Food.
I got the urge to do some more Chinese cooking and decided to go to a Restaurant Sales Store and buy an authentic Wok. And did so.

First two dishes were fried rice and a lemon chicken dish. I'm so glad I did, they were delicious. I love fried rice because of the wide variety of items you can add to it. Not all combinations work, but this one did. That being said, see my note at the bottom of this post.

One key to the lemon chicken was to cut the chicken into pieces and let it marinade in soy sauce and sesame oil for 24 hours. The marinade completely saturated the chicken, and when cooked and eaten, the chicken was bursting with that delicious taste combination. Lastly, the lemon sauce had that perfect balance of lightly lemony taste, and a not overly thick sauce. (Adapted from Appetite for China)

You can make these dishes in a large cast iron skillet as I have for years, but it's easier, and more fun with a wok.

Ingredients and Method:
2 skinless chicken breasts cut into bite size pieces
1 cup cornstarch
1/2 teaspoon pepper
1/2 cup oil (I use Canola or Peanut)
Sesame seeds for garnish

Marinade:
4 tablespoons soy sauce
1/2 teaspoon sesame oil

Lemon Sauce:
2 cloves garlic, minced
2 teaspoons ginger, minced
3 tablespoons fresh lemon juice (1 large lemon yields 3 tablespoons)
2 teaspoons lemon zest
1/4 cup chicken stock
1/4 cup sugar
1 teaspoon corn starch dissolved in 1/4 cup water

chopped green onion for garnish

Rinse and dry chicken breasts and cut into 1 inch cubes. Place in bowl and add soy sauce and sesame oil, cover and marinate for at least 8 hours and preferable 24 hours. Stir every few hours to ensure all pieces are marinated evenly.

Blend cornstarch and pepper in a bowl, and dredge chicken directly from the marinade in the cornstarch. Cover completely and place on plate. Continue with remaining chicken.

Add oil to wok or large sauce pan and heat to 360 degrees. Add chicken to oil (8 - 10 pieces at a time, don't crowd) and fry 2 1/2 minutes, turn the chicken over, and fry an additional 2 1/2 minutes. Remove chicken and let drain on paper towels. Let oil return to 360 degrees before cooking additional chicken.

Pour off all but 1 tablespoon of oil from the wok or pan, add ginger and garlic and sauté briefly, approximately 5 minutes, stirring constantly. Add lemon juice, lemon zest, chicken stock and sugar. Heat on medium until sugar is dissolved and then add corn starch and water. Stir until sauce thickens slightly.

Place chicken on plate and drizzle with lemon sauce. Sprinkle with sliced scallions. Serve with white rice.

(Note on rice. I served it with delicious fried rice, but as my dinner guest commented, the flavors in the fried rice competed with the subtle lemon taste of the chicken, and I agree, so I suggest white rice for that reason)

Enjoy!

Sunday, February 21, 2010

Red Beans and Rice


Saints in the Superbowl?  The Saints?  This one's easy. I'm having Red Beans and Rice!

I used Smoked Kielbasa for the sausage but authentic Red Beans and Rice contain Andouille sausage, it's your preference.

I made this in the Pressure cooker. If you are cooking traditionally, cook for 1 1/2 hours until beans are tender. The rest of the recipe remains the same.

(Adapted from About.com)

Ingredients and Method:

1 pound dried red beans or 2 cans drained and rinsed canned red beans. For dried beans, soak overnight in water
1 pound smoked kielbasa sausage, sliced into 1/4 inch thick pieces

1 yellow onion, finely diced
2 stalks celery, thinly sliced
2 cloves garlic, minced
1 teaspoon cumin
1 teaspoon thyme
2 teaspoons vegetable or olive oil
1/4 teaspoon cayenne pepper
1 quart chicken broth
2 tablespoons parsley
salt and pepper to taste

Scallions and white rice for accompaniment

Add oil to pressure cooker over medium heat. Brown sliced sausage on both sides, approximately 5 minutes per side. Remove and drain on paper towels. Add onion, celery and garlic, and saute for 10 minutes until onion is translucent and celery softens.

Add cumin, thyme and cayenne pepper and saute one minute more. Add chicken broth, beans and sausage.

Cover, turn heat up and bring up to pressure, 15 p.s.i.  Once the cooker begins to steam steadily, turn heat down to low, and let cook for 10 - 15 minutes under pressure. Remove from heat and let cool naturally.

Remove cover and check to make sure the beans are tender. (No need if you used canned beans) If the beans are not done, repressurize and cook for 5 minutes more. Season with salt and pepper.

Serve over freshly cooked rice and garnish with green onions.

Monday, February 15, 2010

Sauerbraten German Pot Roast


So I came across this recipe. I've heard of Sauerbraten but have never made it nor tried it. What intrigued me about making it was marinating the cut of meat for 3 days, perhaps adapting it for the Pressure Cooker, and the addition of crushed ginger cookies to the marinade to thicken and make a gravy for the meat.

Will I make this again? You bet! The meat was deliciously tangy sour (hence the name Sauerbraten) and as tender and delicious as could be.

The gravy however, I guess I expected it to be more of a contributor than what it was so I "doctored" it a bit. I added a bit more sugar because it was still very sour, and I added some ground ginger to give it some "bite".  It accompanies the meat wonderfully since it's the marinade for the meat, it just needed a boost. Feel free to experiment with your own thoughts or preferences.

That being said, this was the most tender, delicious cut of roast I've had in years and years.

Adapted from:  Joelen's Culinary Adventures. 


Ingredients and Method:

1 cup Red Wine Vinegar
1 cup Cider Vinegar
1 1/2 cups water
1 sweet onion, chopped
1 carrot chopped thinly
1 teaspoon ground mustard
2 bay leaves
6 minced cloves
2 - 3 pound bottom round roast
1 tablespoon salt
1/2 teaspoon pepper
1 tablespoon olive oil
1/2 cup sugar
15 gingersnaps, crushed
1 teaspoon ground ginger

All right, so here's what we're gonna do. We're gonna make a marinade, and marinate the roast for 3 days.  Yes, 3 days!   It'll be worth the hassle, believe me.

(Pressure Cooker note. The only difference in the recipe directions if you're NOT using a pressure cooker, is to bake it in the oven at 350 degrees for 4 to 5 hours until fork tender)

In a saucepan combine both vinegars, water, salt, pepper,  carrots, onions, bay leaves, cloves and ground mustard. Bring to a boil, reduce heat and simmer for 10 minutes, let cool.

Pat the roast dry, sprinkle with salt and pepper, add 1 tablespoon olive oil  to a medium frying pan and brown meat on each side until browned, approximately 10 minutes per side.

Remove from heat.

Pour marinade into non-reactive dish. Add roast to dish. If the roast is not covered with marinade simply plan on turning the roast once a day so both sides get equally marinated. Cover with plastic wrap and refrigerate for 3 days.

When ready to cook/bake, remove roast, and pour all of marinade into pressure cooker (or baking dish). Cut any exposed fat from the roast. Add the roast, turn up heat, cover and bring up to 15 p.s.i. When the cooker begins to steam steadily, turn the heat down to low, and let cook at pressure for 60 minutes. (Or, as stated earlier, bake at 350 degrees for 4 - 5 hours). Let cool naturally.

Remove roast to cutting board and let rest.

Strain marinade mixture into bowl. Don't be afraid to mash solids through the mesh to give the gravy some "body".

Pour into saucepan, add sugar, ginger, and crushed ginger cookies. Bring to a boil, reduce heat, and continue to stir and simmer, until gravy thickens.
Remove from heat and skim any visible fat from surface.

Slice roast against grain into approx. 1/4 inch slices, arrange on plate, and ladle gravy over. Garnish with parsley and enjoy!

Wednesday, December 16, 2009

Apricot-Glazed Turkey with Roasted Onion and Shallot Gravy


This is a recipe for Turkey that I came across in Bon Appetit 14 years ago. I have faithfully made this my Turkey recipe ever since then. I find it foolproof, delicious, moist meat always, and the gravy is simply to die for. Check it out and you'll see what I mean.


Apricot Glaze
1 cup apricot nectar
1 cup apricot preserves
2 tablespoons minced peeled fresh ginger
1 tablespoon honey

 
Herb Butter
3/4 cup (1 1/2 sticks) unsalted butter, room temperature
3 tablespoons chopped fresh thyme or 1 tablespoon dried
3 tablespoons chopped fresh sage or 1 tablespoon dried rubbed sage
1 1/2 teaspoons salt
1 teaspoon ground black pepper

 
Onion Mixture
2 tablespoons (1/4 stick) unsalted butter
3 large onions (about 2 pounds), thinly sliced
6 ounces shallots (about 6 large), thinly sliced
 

Turkey
1 21- to 22-pound turkey
1 14 1/2-ounce can (or more) low-salt chicken broth
1 teaspoon chopped fresh thyme or 1/2 teaspoon dried
1/2 teaspoon chopped fresh sage or 1/4 teaspoon dried

 
Gravy
1 14 1/2-ounce can (about) low-salt chicken broth


For Glaze:
Combine all ingredients in heavy small saucepan and bring to boil. Reduce heat to medium-low and simmer until thickened and reduced to 1 1/4 cups, about 15 minutes.


For Herb Butter:
Blend all ingredients in small bowl. Set aside.

For Onion Mixture:
Melt butter in heavy large skillet over medium heat. Add onions and shallots and sauté until very soft and light brown, about 20 minutes. (Glaze, herb butter and onion mixture can be prepared 1 day ahead. Cover separately and chill. Bring herb butter to room temperature before continuing.)

For Turkey:
Position rack in lowest third of oven and preheat to 400° F. Pat turkey dry with paper towels. Season turkey cavity with salt and pepper. Place turkey on rack set in large roasting pan. Slide hand under skin of turkey breast to loosen skin. Spread half of herb butter over breast under skin. If stuffing turkey, spoon stuffing into main cavity. Place remaining herb butter in small saucepan. Stir over low heat until melted. Brush butter over outside of turkey. Tie legs together loosely to hold shape of turkey. Roast turkey 30 minutes. Reduce oven temperature to 325° F. Roast turkey 1 hour 30 minutes, basting occasionally with pan drippings. Tent turkey with heavy-duty foil; roast 45 minutes longer. Add onion mixture, 1 can broth, thyme and sage to pan. Roast 15 minutes. Bring glaze to simmer. Brush 1/2 cup glaze over turkey. Continue to roast turkey uncovered until meat thermometer inserted into thickest part of thigh registers 180° F. or until juices run clear when thickest part of thigh is pierced with skewer, brushing occasionally with glaze and adding more broth to pan if liquid evaporates, about 40 minutes longer for unstuffed turkey (about 1 hour 10 minutes longer for stuffed turkey). Place turkey on platter, tent with foil. Let stand 30 minutes. Reserve mixture in pan for gravy.

For Gravy:
Pour contents of roasting pan into strainer set over large bowl. Spoon fat from pan juices in bowl. Transfer onion mixture in strainer to blender. Add 1 cup pan juices to blender and puree until smooth, adding more pan juices and chicken broth if necessary to thin sauce to desired consistency. Transfer sauce to heavy large saucepan and bring to boil. Cook until color deepens, skimming off any foam, about 5 minutes. Season with salt and pepper.
Serve turkey with gravy.


For Herb Butter:
Blend all ingredients in small bowl. Set aside.

For Onion Mixture:
Melt butter in heavy large skillet over medium heat. Add onions and shallots and sauté until very soft and light brown, about 20 minutes. (Glaze, herb butter and onion mixture can be prepared 1 day ahead. Cover separately and chill. Bring herb butter to room temperature before continuing.)

For Turkey:
Position rack in lowest third of oven and preheat to 400° F. Pat turkey dry with paper towels. Season turkey cavity with salt and pepper. Place turkey on rack set in large roasting pan. Slide hand under skin of turkey breast to loosen skin. Spread half of herb butter over breast under skin. If stuffing turkey, spoon stuffing into main cavity. Place remaining herb butter in small saucepan. Stir over low heat until melted. Brush butter over outside of turkey.
Tie legs together loosely to hold shape of turkey. Roast turkey 30 minutes. Reduce oven temperature to 325° F. Roast turkey 1 hour 30 minutes, basting occasionally with pan drippings. Tent turkey with heavy-duty foil; roast 45 minutes longer. Add onion mixture, 1 can broth, thyme and sage to pan. Roast 15 minutes. Bring glaze to simmer. Brush 1/2 cup glaze over turkey. Continue to roast turkey uncovered until meat thermometer inserted into thickest part of thigh registers 180° F. or until juices run clear when thickest part of thigh is pierced with skewer, brushing occasionally with glaze and adding more broth to pan if liquid evaporates, about 40 minutes longer for unstuffed turkey (about 1 hour 10 minutes longer for stuffed turkey). Place turkey on platter, tent with foil. Let stand 30 minutes. Reserve mixture in pan for gravy.


For Gravy:
Pour contents of roasting pan into strainer set over large bowl. Spoon fat from pan juices in bowl. Transfer onion mixture in strainer to blender.


Add 1 cup pan juices to blender and puree until smooth, adding more pan juices and chicken broth if necessary to thin sauce to desired consistency. Transfer sauce to heavy large saucepan and bring to boil. Cook until color deepens, skimming off any foam, about 5 minutes. Season with salt and pepper.
Serve turkey with gravy.


Wednesday, October 28, 2009

Pressure Cooker Pot Roast

If you've been reading my blog, you know I'm about Pressure Cooking now. I'm just loving it. It still blows my mind how fast things will cook and yet the taste is still what you are searching for.

Have you ever slow-cooked Spaghetti sauce for instance for hours? You know delicious it is, the flavors so well blended together, the velvety sauce? Ya know? TEN minutes in a slow cooker!

But today, we are tackling an American Sunday Staple. Pot Roast.

For a pot roast we generally use a cheaper cut of meat, which then requires a longer cooking time (hours) in order to break down the meat and have it become tender. It's ok, because we usually add potatoes and carrots and cook them right along with it, so it all comes out tender with a form of gravy already made. Delicious.

In a pressure cooker? 45 minutes! And some of the best gravy I bet you've had. Check it out.

Ingredients and Method:

2 tablespoons olive oil
1 3 lb chuck roast
1 large sweet onion, roughly chopped (I like chunks of onions in my gravy)
1 package brown gravy mix
1 package ranch dressing mix
1 package italian dressing mix
1 can beef broth
1/2 teaspoon smoked paprika
2 tablespoons worcestershire sauce
1 clove garlic, minced
1 beef bouillon cube
salt and pepper to taste
12 small red potatoes, halved
3 medium carrots, peeled and chopped
2 bay leaves

Turn heat under Pressure Cooker to medium and add olive oil. Sprinkle roast on all sides with salt and pepper. Place into cooker and brown all over, about 10 minutes per side.

Add onion, gravy mix, ranch dressing mix and italian mix , beef broth, paprika, worcestershire sauce, garlic, and beef bouillon cube all over the roast in the cooker. The pressure cooker will distribute everything just fine.


Turn heat to high, let liquids come to a boil, and then seal the pressure cooker. Wait until a steady stream of steam is being emitted, and immediately turn to medium low, and begin timing 30 minutes from this point.

After 30 minutes of a steady stream of steam from the cooker, remove from heat and run cold water over the cooker until pressure recedes. Open cooker, and add bay leaves, carrots and potatoes to the liquid surrounding the roast.


Place cooker back on stove and bring to high heat and a boil. Seal cooker with cover, wait until it's emitting a steady stream of steam, turn to medium low and time for 15 more minutes to continue cooking the roast and cooking the carrots and potatoes perfectly.

After 15 minutes, remove from heat, and let cool down naturally. Remove cover.

If the "gravy" is not to your liking or too thin, remove the roast and vegetables, and stir in 2 tablespoons corn starch dissolved in 4 tablespoons water, and stir in over medium heat until gravy thickens....

Let roast rest on a cutting board for 15 minutes, and slice and serve with potatoes, carrots and gravy.

Enjoy!

Wednesday, October 14, 2009

Pressure Cooker Spaghetti and Meatballs


Spaghetti and meatballs in 10 minutes and it tastes like it was slow cooked for hours. I'm not joking.

A deep, tangy and robust taste, sauce as smooth as butter, and the most tender meatballs one can make I think.

You can slow cook this same recipe for hours and if you do. Save half the sauteed onions and half the spices to be added during the last hour of cooking. Slow cooking tends to flatten the taste of spices and such and reserving half and adding late in the cooking cycle will "brighten" the taste once more.

That being said. Use a Pressure Cooker. I admit I just bought one and am learning to use it myself, but this recipe came out so good, I would recommend you have to try the pressure method. It may very well be the only way you make spaghetti sauce from now on.

Ingredients and Method:

1/2 package frozen italian meatballs (I found a full package to be too many)
2 tablespoons olive oil
2 14 1/2 oz cans diced tomatoes with juice
2 8 0z cans tomato sauce
1 small can tomato paste
1 large sweet onion
4 cloves minced garlic
1/2 cup red wine
1 tablespoon oregano
1 tablespoon thyme
1 tablespoon basil
3 bay leaves
2 tablespoons brown sugar

Pour olive oil into pressure cooker, and bring to medium heat. Saute diced onions until they soften and start to become translucent. Add garlic and continue to saute for 3 - 4 minutes, stirring occasionally.

Add the balance of the ingredients to the cooker. Tomatoes, paste, sauces, wine, spices, and brown sugar. Pour the meatballs right in. Even frozen will work fine.

Turn the heat up, uncovered, and stir until the sauce begins to bubble vigorously. Place the top on the cooker and seal, still on high heat. Leave on high until it begins to steam continuously, then immediately turn to medium low, just enough to have a constant gentle flow of steam escaping for the cooker.

Begin timing the 10 minutes once you turn the heat down as explained above. When the time has elapsed, quick cool the pressure cooker by running it under cold water.

Uncover, and what I like to do is, is turn on a gentle low heat, and let the sauce bubble gently while I prepare the pasta, and bread, and salad or whatever you are serving it with. It's done, but a little gentle further cooking never hurt a spaghetti sauce.

Ladle spaghetti sauce and meatballs over freshly cooked pasta and top with Parmesan cheese, or my current favorite, Parmesan Reggiano.

Enjoy.

Sunday, October 4, 2009

Slow Cooker Cuban Pork Shoulder (Pulled Pork)

Pulled Pork! Who doesn't like a pulled pork sandwich with Barbeque Sauce, or perhaps also some coleslaw? (North Carolina Style) I've even made pulled pork enchiladas which were out of this world.

But let's face it, it's a hassle to make right? Lot of work? Pain in the butt? (no pun intended)

NOPE! It's really easy. That's what a SLOW COOKER is for.....!

And to boot, this recipe is absolutely delicious! And it's interesting in that you can just make the pork, and serve it with whatever sauce you like, OR, take the drippings from pan, add a few ingredients, reduce the sauce and bake it into the pulled pork. I did this, and amazingly, ate the pork just that way, with no additional sauce, it's THAT good.

Give it a try. You'll thank me. Well, some of you will thank me. Most will make it, enjoy it, and never tell me. But that's ok. I'll know anyway.

Adapted from: Foodie with Family.

5 - 6 pound pork shoulder (Bone-in is tastier)
1/2 cup frozen orange juice concentrate
8 peeled cloves of garlic
1 1/2 tablespoons ground cumin
1 tablespoon oregano
2 teaspoons salt
1 tablespoon pepper
1 tablespoon red pepper flakes
1/2 cup broth (chicken, beef, or vegetable)
1 tablespoon olive oil
1/4 cup lime juice

Pour the olive oil into the slow cooker and spread around evenly.

Place the pork shoulder, fat side up, into the slow cooker. Toss in the peeled garlic cloves.

Sprinkle the roast with the salt, pepper, red pepper flakes, oregano, and cumin. Pour the lime juice and broth around the roast, and pour or spoon the frozen orange juice concentrate onto the top of the roast.
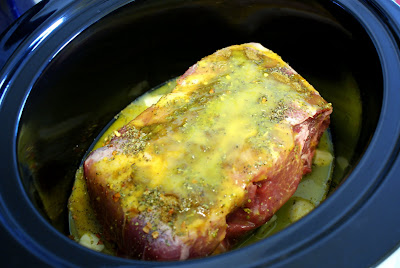
Cook on high for 1 1/2 hours, turn heat down to low and let cook for 12 hours. Check the pork and make sure it is pull-apart tender. Turn off cooker and let cool down and then place to roast in the refrigerator to chill all night long. If your cooker doesn't have the stoneware insert, just place the roast in a large bowl, cover, and refrigerate. Reserve all the liquids.

The next day, remove from refrigerator, place on cutting board, and remove all the exposed chilled fat from the pork and discard. (And the bone if bone-in)

The meat will be easy to pull apart. Use your fingers or two forks and completely separate the pork. At this time you can also chop it with a knife to make more concise pieces.

Now, it's Decision time...... you are done, and could now use the pork in sandwiches, slather with sauce(s), cook in enchilada's or whatever.....

Or, take the next step...... which is to do the following: (Check it out, it's kinda cool)

Drain the reserved pan juices through a strainer or cheesecloth and pour the liquids into a sauce pan.

Add two tablespoons cider vinegar
1 tsp minced garlic
2 tablespoons lime juice
1/2 teaspoon crushed red pepper flakes
1/2 teaspoon dried mustard

Bring to a boil, reduce heat and simmer until sauce is reduced by 75%

Place pork in a 9 x 13 casserole dish and pour the reduction sauce all over the pork. Cover with tinfoil and bake at 350 degrees for 30 minutes.

I found the pork to taste SOOOO good with this baked in marinade that I didn't even use any other sauce when eating it.

Thursday, July 16, 2009

Tikka Masala


One of my favorite blogs, and one of the more popular, is the Pioneer Woman.

A friend of mine was coming up to visit for a weekend. I hadn't seen her in a couple of years and I wanted to prepare something different. She's an ardent follower of my blog, and used to come eat with me all the time when we worked together years ago. And this girl loves to eat. (And weighs about 100 pounds, dammit)

As I was reading the post on the Pioneer Woman, I came across a recipe for Tikka Masala. I'd never made it before, but reading and re-reading the ingredients it sounded delicious. So I decided to use that as a source for making it myself.

Absolutely fantastic. That's all I can say. This stuff ROCKS!

2 - 4 chicken breasts
1/2 cup thick plain yogurt. I use Greek yogurt made by Fage (pronounced fay-yeah)
1 1/2 cups heavy cream
3 tablespoons butter
28 oz can of diced tomatoes
1 yellow or sweet onion
3 cloves garlic, finely minced
1 tablespoon minced fresh garlic
1 tablespoon cumin
1 tablespoon ground coriander
3 tablespoons garam masala spice mix
1 cup Basmati Rice
2 tablespoons turmeric
1 cup frozen peas, optional
Preparations and Method:
Season chicken with salt, pepper, ground coriander and cumin on both sides. Press seasonings into the chicken. Brush both sides liberally with the yogurt.
Place into grilling pan and broil in oven until chicken is done and yogurt slightly blackened. About 10 minutes per side. (Note I used rather thick breasts, and next time I think I'll use thinner ones, both for broiling convenience and time, and also I think smaller pieces in the finished Masala would be better)

In a skillet, melt 2 tablespoons butter over medium heat, and saute diced onions until they become transluscent and soften. Peel, mince and add garlic to onions and continue to saute. Add about 1 tablespoons minced fresh ginger. Add one tablespoon salt.
Meanwhile in a saucepan, bring 2 cups water to boil, quickly add Turmeric, 1 tablespoon butter and rice, immediately turn to low, cover and cook for 20 minutes. Remove from heat, uncover and fluff with fork when ready to serve. (If you like, add a cup of frozen peas to the rice after you remove from heat. They will heat up and cook in the rice as it sits)

Add 3 tablespoons Garam Masala spice to the pan. Add can of tomatoes and stir. Add a tablespoon of sugar and let cook for 5 minutes. Add 1/2 teaspoon cayenne pepper (more if you like a little more heat).
Chop broiled chicken into 1 inch pieces and add to pan. Add 4 tablespoons chopped cilantro.

Add 1/2 cups heavy cream and stir in.

Let cook for 5 more minutes, stirring occasionally, and serve immediately over cooked basmati rice and turmeric.

Garnish with chopped cilantro.
Serve with Garlic grilled Naan bread on the side.

Enjoy!
Lastly, this dish is so delicious, your dinner guests may break out into dance, you never know.

Monday, June 29, 2009

5 Spice Soy Baked Chicken Wings


If you read my blog you know I recently became enamored of Chinese 5 spice powder. See my Cornish Game Hen recipe for instance.

In keeping with that I thought some marinated and baked chicken wings would be just the ticket. I deliberately chose baking over grilling as I wanted to avoid having to tend the wings over the fire constantly to keep from charring.

These were simply delicious, with a different twist due to the combination of spices. I bet you'll like it if you try it.

Ingredients and Method:

20 chicken drumettes (or plain wings if you prefer)
3 tablespoons Worcestershire sauce
1/4 cup ketchup
1 tablespoon finely minced ginger
1/2 cup soy sauce
1/4 cup honey
2 tablespoons 5 spice powder (Don't skimp)
1 teaspoon salt
2 tablespoons cornstarch
1/4 cup water

Mix together corn starch and water and pour into bowl. Add the balance of the marinade ingredients and stir well.

Pour into large freezer bag, add drumettes, seal and refrigerate and marinate overnight. Yes, overnight.

Heat oven to 350, lay tinfoil over a baking pan and place chicken into pan.

Meanwhile bring marinade to a boil, reduce heat and let thicken slightly for 5 minutes.

Bake chicken while turning and continuing to baste liberally and repeatedly with the marinade until done. You want a nice coating to build up as they bake. About 45 minutes. Meat should easily separate from the bone.

Enjoy!